Introduction
In this tutorial you'll learn how to use multiple forms, how to handle user input and how to use sessions.
In order to understand and run the example in this tutorial you should read the "Hello World" tutorial first.
What is Next
This application is built using IntraWeb's application mode.
The last tutorial was very basic and designed to simply show you how easy it is to get an IntraWeb application up and running. As you will soon see the code used is still standard Delphi code. We challenge you to try even something this simple with any other web development tool. Other development tools require you to set up adaptors, bindings, or handle the HTTP variables your self. Not IntraWeb, IntraWeb is truly componentized.
For this demo, we will continue by modifiying our "Hello World" application built in the Hello World demo. If you have not created this project yet, you will need it for this demo.
Changes to the Main Form
| ·
|
Set the form's Title property to "What is your name?". This will be displayed as the page title when shown in the browser.
|
| ·
|
Change the label's Caption to read "What is your name?"
|
| ·
|
Add a TIWEdit to the form.
|
|
|
·
|
Set the Text property to be blank.
|
|
|
·
|
Set the Name property to editName.
|
| ·
|
Add a TIWButton to the form.
|
|
|
·
|
Set the Caption property to "Talk to me!".
|
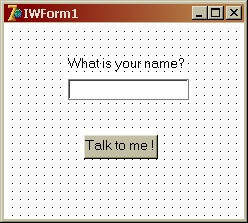
Your form should now look something like this:
New Main Form
Handling a Button Click
If you have never worked with web development tools before, this next step will not seem like magic for you as you will think, "This is the way it should work, no?". However if you have worked with other web development tools, you will now really begin to see where IntraWeb is different.
To handle a button click in IntraWeb, it is just like a normal Delphi application. Simply create a OnClick event for your button and add code. To do this, double click on the button. Delphi will create a shell event for you similar to this:
|
|
procedure TIWForm1.IWButton1Click(Sender: TObject);
|
Add the following code to the event:
|
|
procedure TIWForm1.IWButton1Click(Sender: TObject);
|
|
|
WebApplication.ShowMessage('Please tell me your name!');
|
|
|
WebApplication.ShowMessage('Hello ' + s + '!');
|
Testing the Application
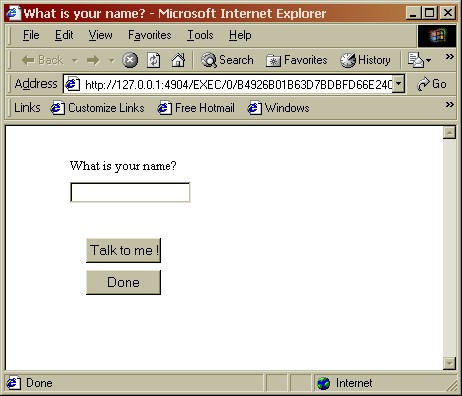
Run the application as we did in the previous demo, and press F9 again after the debug window appears to launch the browser. The browser should appear like this:
In Internet Explorer
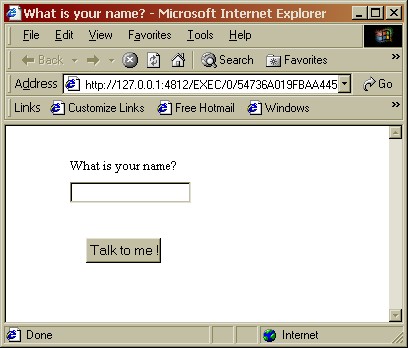
Notice the browser has picked up on the page title as set in the form's title property.
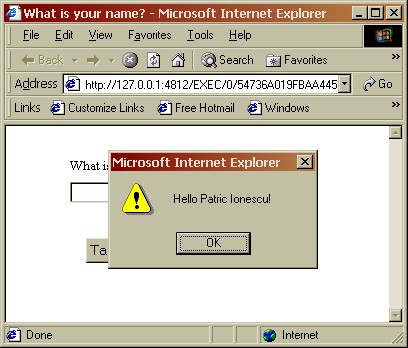
Enter your name in the edit box and press the button. The browser will respond like this:
Hello !
Special Notes
Netscape Users
Please see "Why when debugging using the IDE and Netscape 4 is the application is slow on the development machine and the task manager shows 100%?" in the FAQ.
Internet Explorer Users
Please see "When when using Internet Explorer is there a delay when I first click on a button?" in the FAQ .
Farmers
Please see "Why did the chicken cross the road?" in the FAQ.
Code Examination
Wow! That was pretty cool eh? Yes, but the really cool part was that it was done purely with standard Delphi code. We still have not written a single line of HTML or Javascript, and this is exactly how IntraWeb works. Let's take a look again at the code we wrote to do this and examine it line by line.
|
|
// To handle the button click all we did was define an OnClick! End of story! WOW!
|
|
|
procedure TIWForm1.IWButton1Click(Sender: TObject);
|
|
|
// Read the users entered text from the Text property.
|
|
|
// No parsing of HTTP variables, no adaptors, no bindings.
|
|
|
// JUST like Delphi! Wow again!
|
|
|
// See if the user entered anything, or if they left it blank!
|
|
|
// Show a message dialog. Could it be any simpler?
|
|
|
WebApplication.ShowMessage('Please tell me your name!');
|
|
|
// Show a message dialog. Could it be any simpler?
|
|
|
WebApplication.ShowMessage('Hello ' + s + '!');
|
|
|
// Clear the edit box. The properties are not only for reading, but writing too!
|
Multiple Forms
ust to show you that there are no hidden gotchas with IntraWeb, let's continue on and show you how easy it is to do multiple forms with IntraWeb.
Select New | Other from the File menu, and select the IntraWeb tab. This time select New Form and click OK:
Creating a New IntraWeb Form

The following dialog will appear, allowing you to select the form type:
New Form Wizard
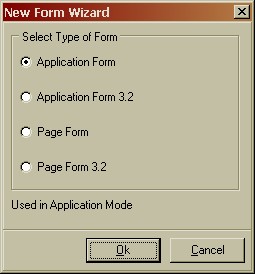
This dialog allows you to select whether you want a Page Mode form, or an Application Mode form. For each of those, the HTML type is also selectable, so you can chose to produce a HTML 3.2 form or a HTML 4.0 form. For this tutorial we'll chose "Application Form", which will produce a HTML 4.0 application mode form. For a detailed explanation of page mode and application mode, please refer to the IntraWeb Manual.
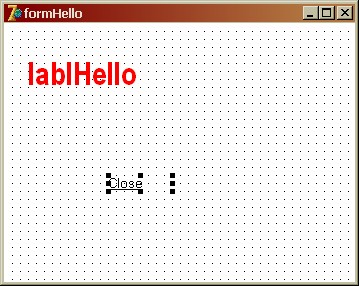
You will now have a new blank form again:
New Blank Form

Using the property inspector, apply the following changes:
| ·
|
Change the form Name property to formHello.
|
|
|
·
|
Set the Name property to lablHello.
|
|
|
·
|
AutoSize = False. We will be adjusting the text at run time and thus will be manually adjusting the width.
|
|
|
·
|
Set the Caption property to Close.
|
|
|
·
|
Create an OnClick event by double clicking on the TIWLink.
|
|
|
·
|
Add the following statement to the event:
|
|
|
procedure TformHello.IWLink1Click(Sender: TObject);
|
Your form should now look something like this:
Now let's move back to our main form. Change the button click event to read as follows:
|
|
ServerController, IWBaseForm, unit2; //Note - if you changed your second form's filename - change this!
|
|
|
procedure TIWForm1.IWButton1Click(Sender: TObject);
|
|
|
WebApplication.ShowMessage('Please tell me your name!');
|
|
|
with TformHello.Create(WebApplication) do
|
|
|
Title := 'Saying Hello to ' + s + '!';
|
|
|
lablHello.Caption := 'Hello ' + s + '!';
|
Let's also add one more TIWButton to the main form. Set its caption to Done, and create an OnClick event to read:
|
|
procedure TIWForm1.IWButton2Click(Sender: TObject);
|
|
|
WebApplication.Terminate('Goodbye!');
|
Now run the application and press F9 when the debug window appears. The browser should appear similar to this:
Enter your name and click the Talk to Me! button. The browser now displays your second form like this:
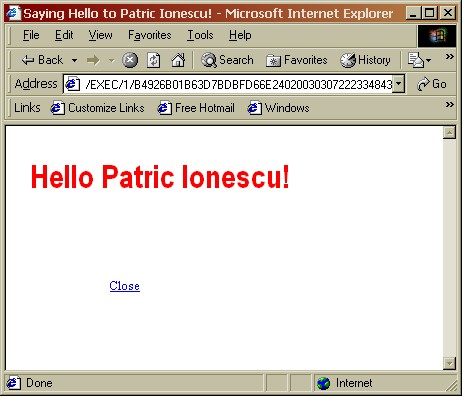
Notice that even the browser caption has been updated with your name. Click the Close link. The browser will return to your main form:
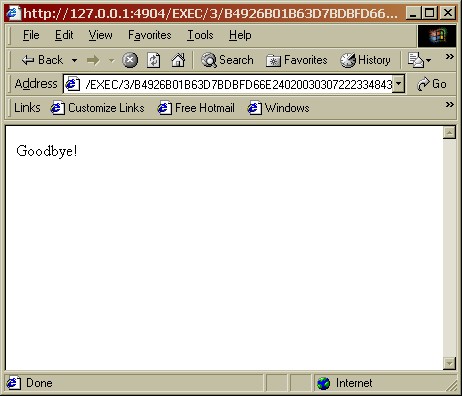
Now click the Done button. The browser will terminate the application and display this message:
Wow! Multiple forms, transparent user input, automatic session management, the works! And we still have not written a single line of HTML or Javascript. Does it get better? Yes it does, but you will need to see for yourself by trying IntraWeb.
Code Examination
|
|
procedure TformHello.IWLink1Click(Sender: TObject);
|
|
|
// This frees the current form and returns to the previous active form
|
|
|
procedure TIWForm1.IWButton1Click(Sender: TObject);
|
|
|
WebApplication.ShowMessage('Please tell me your name!');
|
|
|
// Create a new form. It is owned by WebApplication which is
|
|
|
// IntraWeb's equivalant of Application. WebApplication
|
|
|
// represents the user's session.
|
|
|
with TformHello.Create(WebApplication) do
|
|
|
Title := 'Saying Hello to ' + s + '!';
|
|
|
// Set the caption of our label on the second form
|
|
|
lablHello.Caption := 'Hello ' + s + '!';
|
|
|
procedure TIWForm1.IWButton2Click(Sender: TObject);
|
|
|
// Terminate the user's application and display a message.
|
|
|
// There are many variants of Terminate that can terminate
|
|
|
// with messges, redirets, etc...
|
|
|
WebApplication.Terminate('Goodbye!');
|
Faster Web Development
If you are a Delphi shop, there is no doubt your programmers can be up and running with IntraWeb in a matter of minutes while continuing to use their existing skills. You can develop web applications in days instead of months, and you can take on web projects previously deemed impossible or too time consuming. Now, can you honestly say that about any other web development tool?
Conclusion
This tutorial took the next step and demonstrated the ease of handling user input and managing multiple forms.However IntraWeb is far more powerful and has many more features than what has been demonstrated here. To see the full power of IntraWeb you need to look at the included demos and better yet, write your own application.
The evaluation version is fully functional, so what are you waiting for?
Download IntraWeb Now!
|